THE ELASMODIVER SHARK AND RAY FIELD GUIDE


SHARK GUIDE

SHARK PICTURES

WHAT'S NEW?

SHARK BLOG

MERCHANDISE

SHARK TRIPS

SITE MAP

E-MAIL


 SHARK INFO

SHARK & RAY FIELD GUIDE

SHARK PICTURE DATABASE

SHARK TAXONOMY

SHARK

BIOLOGY

SHARK EVOLUTION

SHARK FACTS FOR KIDS


SHARK DIVING

SHARK DIVING EXPEDITIONS

SHARK DIVING 101

SHARK DIVING HOTSPOTS

SHARK DIVING STORIES

SHARK FEEDING ADVICE

SHARK

ATTACKS


CONSERVATION

SHARKS UNDER THREAT

PREDATORS IN PERIL


PHOTOGRAPHY

SHARK PHOTO TIPS

DAILY SHARK IMAGES


RESOURCES

SHARK NEWS

SHARK LINKS

SHARK BOOKS

SHARK FILMS

SHARK TERMS


WEB STUFF

CONTACT ELASMODIVER

ABOUT ELASMODIVER

ANDY MURCH ELASMO GEEK


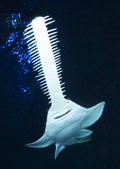
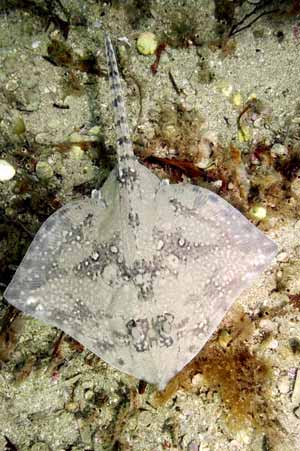
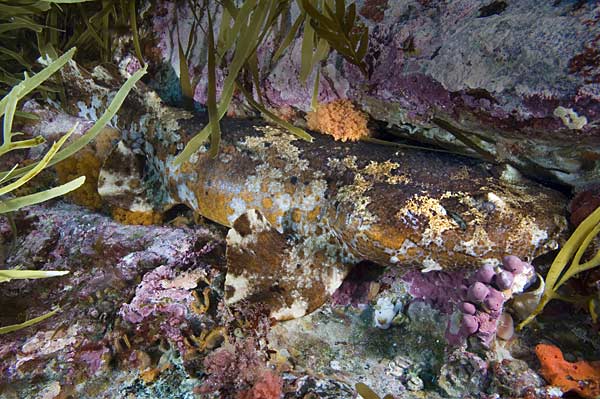
WHAT IS ELASMODIVER?

Not just a huge collection of Shark Pictures: Elasmodiver.com contains images of sharks, skates, rays, and a few chimaera's from around the world. Elasmodiver began as a simple web based shark field guide to help divers find the best places to encounter the different species of sharks and rays that live in shallow water but it has slowly evolved into a much larger project containing information on all aspects of shark diving and shark photography.

There are now more than 10,000 shark pictures  and sections on shark evolution, biology, and conservation. There is a large library of reviewed shark books, a constantly updated shark taxonomy page, a monster list of shark links, and deeper in the site there are numerous articles and stories about shark encounters. Elasmodiver is now so difficult to check for updates, that new information and pictures are listed on an Elasmodiver Updates Page that can be accessed here:

WHAT'S NEW?

Shark picture - green sawfish

_


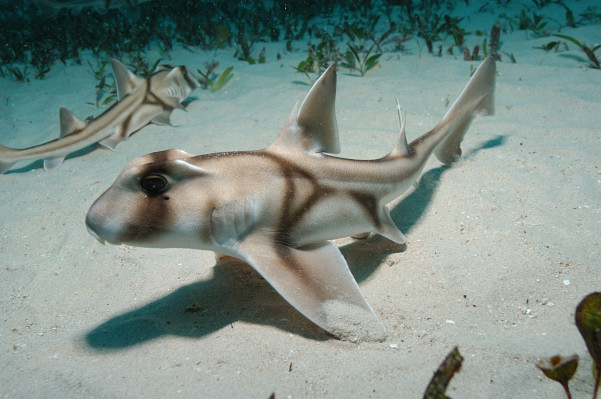
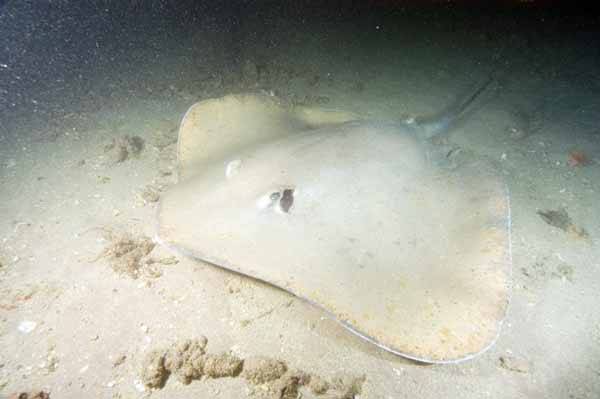
SHARK PHOTOGRAPHY - STROBE USE


Even in shallow water the use of strobes makes an obvious difference.


Look at the two images above. They were shot in barely 20' of water but without the use of artificial light the left image is reduced to shades of blue and gray. The image on the right however has been lit by two strobes. Although the scene is fairly drab the difference in color variety, clarity and contrast are immediately obvious. If you are new to the underwater photography world and you have an introductory level camera you may think that your setup does not warrant the expense of a strobe but it is the critical ingredient. Whether you shoot with a $200 or $20,000 system a strobe or two will make a world of difference. Without artificial lighting the cobbler wobbegong below would have been all but invisible.


Convinced? So what type of strobes do you need to shoot sharks?

POWERFUL WIDE ANGLE ONES! Strobes come with different angles of coverage and different maximum outputs.

The concept is pretty simple. In order to throw light at your subject, the strobe has to take energy from the battery pack and force it across a wire or network of wires. The wires discharge some of this energy in the form of heat and light. There is only so much energy available in the batteries and the light is absorbed very quickly by the water so the best way to throw the light as far and brightly as possible is to make the beam very narrow.

That's not such a good thing for shark photographers. Sharks are big subjects and we need the light from the strobe to be released at a wide enough angle to illuminate the whole animal. So when choosing a strobe you need to look at the angle of coverage. Ideally it should be above 100 degrees. The wider the better.

The trade off is that the light is then less concentrated hence the need for the strobe to be as powerful as possible.

Beyond 8ft or so most of the light thrown by the strobes has been absorbed by the water. You can still light your subject but you will lose the rich colors that you can obtain when closer. Sharks don't necessarily like coming close to divers and are notoriously camera shy so its wise to choose a strobe that has enough output energy to light your subject from a distance.

I haven't used every strobe out there but there are a few tried and tested models that seem to end up in many shark photographers dive bags. They're generally unwieldy but will give better results that smaller models. Ikelite's 200, Sea & Sea's YS 350, and Subtronic's Mega series are all well respected wide angle strobes.

Two strobes are better than one. The problem with using a strobe is that the light that it puts out leaves hard shadows where it cannot reach. If you are using a very low setting it may not be too distracting but if your strobe is the main source of illumination of your subject then you need to find a way to dilute the shadows. The way to do this is to have two strobes shining on the subject from different places. There may still be an area where neither strobe can reach but the area will be much smaller. While photographing the juvenile Port jackson shark (below) I flooded one of my strobes resulting in the ugly long shadows that you can see on the sand.

If you only have one strobe bulkhead on your camera housing you can sometimes fire the second one as a slave. Ikelite sells a remote slave sensor that allows a second strobe to read the output of the primary strobe and fire at the same power level.

Strobe Position. I could have eliminated most of the shadow under the Port Jackson shark if I had positioned my remaining strobe right next to the lens. Any shadows would have fallen behind the shark and been invisible from the cameras perspective. So why didn't I?

Working this close to the sand makes it virtually impossible to avoid stirring up small particles which swirl around in the water column almost unnoticed until illuminated by an underwater strobe. Then, these tiny innocuous specks flare into existence destroying your carefully constructed masterpieces. Back-scatter is the bane of all underwater photographers.

How do you eliminate back-scatter? You cant, but you can do your best to minimize it. Positioning your strobes off to the sides as far as the strobe arms will allow, will stop a great deal of the particles being picked up by the camera lens. The light hits the side of the particles instead of the front and if you're lucky none of the light will then bounce back towards the camera.

In the Roughback stingray picture below, my left strobe is probably not extended as far. Consequently the 'snow' only appears on the left. Angling the strobes out slightly also helps reduce back scatter.


More on positioning.

you need to decide whether the strobes point up or down.

Shooting sharks from below is very dramatic. Nice white bellies against darker water. The trouble is that you can very easily blow out the whites because they reflect so much light. The pictures below were shot with my strobes off to the sides and about level with the camera. The image on the left is fine because the sharks belly is hidden but the image on the right has lost most of its detail because the white underside of the shark  has been blown out by the strobe.  If you don't want to turn down your strobe power because you want to add color to the diver but you're worried that you will blow out the shark's white belly, position your strobes higher and angle them down. It will help a little but most of the correction needs to come from your strobes power settings. Ideally you want your strobes exactly horizontal and as wide as possible for these types of shots.


Exposing your subject correctly. TTL compatible strobes will do a lot of the exposure work for you. They work by measuring the amount of light that the camera thinks it needs to correctly expose the content in front of it. The trouble with using TTL is that in a wide angle setting there can be a vast range of light levels that the camera is not able to compensate for. It will also average the ambient light that it senses so unless the shark  is filling the frame your camera might not get it right.

If like me you don't have a TTL setup you'll have to study the table that comes with your strobe. It will tell you what power setting to put it on depending how far you are from the subject and what camera settings you are using. If you're shooting with a digital SLR that has image review you can take a few shots of an object near you with different strobe power settings until you see the colors you want. If your images look monochrome they're getting too little or too much flash. Its easy to tell which because they'll also look too dark or light.

When the sharks show up crank down the power level slightly or jump up an F-stop (see exposure experiments) to avoid over exposing white bellies.


A note on strobe arms:

Buy arms that have an elbow so that you can easily adjust the distance to the camera. Long arms are better than short. Long arms can be bent shorter but short arms cant grow. If your system is negatively buoyant you can get hollow arms from companies like Ultralight that add a little buoyancy and stop your camera weighing you down. But, negative camera systems usually feel more stable anyway.


In a nutshell...

  1. Use two powerful wide angle strobes.

  2. Spread them apart as far as possible when particles are likely to be in the way.

  3. Angle the strobes slightly outwards if you can.

  4. Play with the strobe positions to avoid blowing out white areas.

  5. Read your strobe power chart or take some experimental shots to find the correct setting.

  6. Turn them down slightly to avoid over exposing bellies.

  7. Get long strobe arms.

Now you're on your way but there is a lot more that you can play with. You can get very creative with remote strobes and even bring down massive professional lights that turn night into day if you have a desire to. I'm happy shooting with twin strobes and no TTL but thats just me and I'm still learning like everyone else.

Once you have your strobes lighting your foreground properly you need to learn how to use them in conjunction with the natural light in the environment. Your strobes will only light up a few feet of space around them so understanding how to correctly expose your background and foreground takes a little more knowledge. Now its time to learn more about exposure...

Andy Murch works as a Photographer for Shark Diver Magazine.

 BACK TO SHARK PHOTOGRAPHY MAIN PAGE

HOME     LINKS     TAXONOMY      UNDER THREAT     BOOKS     CONTACT


 SHARK TRIPS


MORE EXPEDITIONS


SPONSORS


ADVERTISERS


ELASMO-BLOGS

SharkPictures   Shark & Ray Field Guide   SharkPhotography   SharkDiving   Taxonomy   Evolution   Biology   SharkAttacks   Books   Shark Movies   Stories   Extinction   Protection   Updates   SiteMap


CONTACT ELASMODIVER

elasmodiver@gmail.com

250-588-8267

P.O.Box 8719 Station Central, Victoria, BC., V8W 3S3, Canada